How to Implement Authentication and Authorization in Golang.

I think I am a developer!
In today's world, security is a critical aspect of any application and it's crucial to ensure that the application and its data are protected from unauthorized access. In this blog, we will dive into the implementation of Role-Based Access Control (RBAC) and Authentication in Golang, which are essential security mechanisms to secure your application and its data. We will explore how to implement RBAC and authentication in Golang and what steps are necessary to implement it effectively. So, grab a cup of coffee and get ready to learn about securing your application with RBAC and authentication in Golang!

🤔 Understanding JSON Web Token (JWT)
JWT, or JSON Web Token, is a widely used standard for authentication and authorization on the web. It is a compact and self-contained token that contains information about the authentication of a user. In our blog, we will be using JWT for authentication.
A JWT token typically consists of three parts:
Header: The header defines the type of the token and the signing algorithm used.
Payload: The payload contains the claims or information about the user, such as their name, ID, and roles.
Signature: The signature is used to verify that the token has not been altered during transmission and is signed using a secret key known only to the server.
In summary, using JWT for authentication means that we will verify the user's identity by exchanging JWT tokens between the client and server and verifying the token's signature to ensure its authenticity.
🏁 Initializing the Project
Let's start with the project. Follow the below steps:
1️⃣ Creating project repository:
Let's name our repository go-auth.
mkdir go-auth
cd go-auth
2️⃣ Initializing the new go module:
The below command initializes a new Go module to track your code's dependencies.
go mod init go-auth
You will see a go.mod file created in the repository after this command.
3️⃣ Downloading Dependencies:
Now that we have a module to track our dependencies, let's quickly install all the dependencies necessary for our project.
We plan to utilize the following dependencies in our project:
gin-gonic - A high-performance HTTP web framework for the Go programming language.
gorm - An ORM library for Go that allows interaction with relational databases.
postgres - A Go library for GORM PostgreSQL Driver
jwt-go - A Go library for encoding and decoding JSON Web Tokens (JWT).
godotenv - A Go library for managing environment variables from a .env file.
bcrypt - A Go library that implements the bcrypt password hashing function.
go get github.com/gin-gonic/gin
go get gorm.io/gorm
go get gorm.io/driver/postgres
go get github.com/dgrijalva/jwt-go
go get github.com/joho/godotenv
go get golang.org/x/crypto/bcrypt
🗂️ Setting up server directories/packages
For the organization of our server, we will categorize the directories into the following sections:
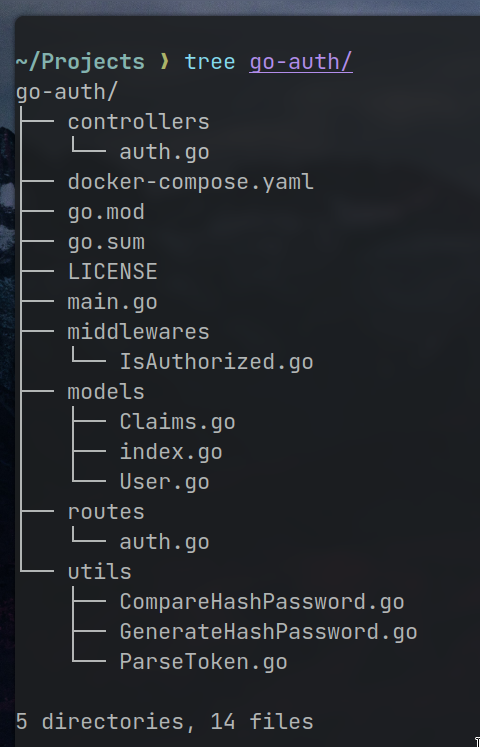
routes - This directory will contain the definitions of the different routes for the server, which map URLs to specific functions.
controllers - This directory will hold the functions that will handle the incoming requests and interact with the models and other components.
models - This directory will store the data models that represent the objects in the application and their relationships.
middlewares - This directory will contain any middleware functions that process requests and responses, such as authentication or logging.
utils - This directory will house various utility functions that are used throughout the application, such as helper functions or custom data types.
These directories will also serve as packages.
📦 Defining the Packages
1️⃣ Defining Models:
We will now proceed with setting up the models for our application.
User - This model will represent a user of the application and will likely include fields such as username, email, and password.
 // PATH: go-auth/models/User.go

 package models

 import "gorm.io/gorm"

 type User struct {
     gorm.Model
     Name     string `json:"name"`
     Email    string `gorm:"unique" json:"email"`
     Password string `json:"password"`
     Role     string `json:"role"`
 }
Claims - This model will contain information about the claims associated with a JSON Web Token (JWT). It will include the standard claims defined by the JWT specification, as well as a field for the user's role within the application.
 // PATH: go-auth/models/Claims.go

 package models

 import "github.com/dgrijalva/jwt-go"

 type Claims struct {
     Role string `json:"role"`
     jwt.StandardClaims
 }
2️⃣ Initializing Database:
Having our models ready, let's Initialize and set up a connection to a PostgreSQL database using the GORM library.
// PATH: go-auth/models/index.go

package models

import (
    "fmt"

    "gorm.io/driver/postgres"
    "gorm.io/gorm"
)

type Config struct {
    Host     string
    Port     string
    User     string
    Password string
    DBName   string
    SSLMode  string
}

var DB *gorm.DB

func InitDB(cfg Config) {

    dsn := fmt.Sprintf("host=%s user=%s password=%s dbname=%s port=%s sslmode=%s", cfg.Host, cfg.User, cfg.Password, cfg.DBName, cfg.Port, cfg.SSLMode)

    db, err := gorm.Open(postgres.Open(dsn), &gorm.Config{})
    if err != nil {
        panic(err)
    }

    if err := db.AutoMigrate(&User{}); err != nil {
        panic(err)
    }

    fmt.Println("Migrated database")

    DB = db
}
Let's understand the above code in detail:
The
Configstruct holds the configuration values for the database connection, such as the host, port, user, password, database name, and SSL mode.The
DBvariable is a global variable that will store the instance of the database connection.The
InitDBfunction is used to initialize the database connection using the values from theConfigstruct.It generates the data source name (DSN) string from the configuration values.
It opens a connection to the PostgreSQL database using the GORM library and the generated DSN. If there is an error, it panics.
It automatically migrates the
Usermodel by callingAutoMigrate. This creates the necessary table in the database if it doesn't exist. If there is an error, it panics.It sets the global
DBvariable to the instance of the database connection.
3️⃣ Creating Routes:
Now, let's define the routes for a web application using the Gin HTTP framework.
// PATH: go-auth/routes/auth.go

package routes

import (
    "go-auth/controllers"

    "github.com/gin-gonic/gin"
)

func AuthRoutes(r *gin.Engine) {
    r.POST("/login", controllers.Login)
    r.POST("/signup", controllers.Signup)
    r.GET("/home", controllers.Home)
    r.GET("/premium", controllers.Premium)
    r.GET("/logout", controllers.Logout)
}
This code defines the routes for the web application but does not handle the logic for each route. That logic is implemented in the controllers package.
Let's understand the above code in detail:
The
AuthRoutesfunction takes agin.Engineinstance as an argument and sets up the routes for the application.Using the
r.POSTmethod, a route for a login request is defined that maps to theLoginfunction in thecontrollerspackage.Similarly, using the
r.POSTmethod, a route for a signup request is defined that maps to theSignupfunction in thecontrollerspackage.Using the
r.GETmethod, a route for a home request is defined that maps to theHomefunction in thecontrollerspackage.Using the
r.GETmethod, a route for a premium request is defined that maps to thePremiumfunction in thecontrollerspackage.Using the
r.GETmethod, a route for a logout request is defined that maps to theLogoutfunction in thecontrollerspackage.
4️⃣ Defining main.go (The Driver Code):
This is the main driver code that will orchestrate the whole project.
// PATH: go-auth/main.go

package main

import (
    "go-auth/models"
    "go-auth/routes"
    "log"
    "os"

    "github.com/gin-gonic/gin"
    "github.com/joho/godotenv"
)

func main() {
    // Create a new gin instance
    r := gin.Default()

    // Load .env file and Create a new connection to the database
    err := godotenv.Load()
    if err != nil {
        log.Fatal("Error loading .env file")
    }
    config := models.Config{
        Host:     os.Getenv("DB_HOST"),
        Port:     os.Getenv("DB_PORT"),
        User:     os.Getenv("DB_USER"),
        Password: os.Getenv("DB_PASSWORD"),
        DBName:   os.Getenv("DB_NAME"),
        SSLMode:  os.Getenv("DB_SSLMODE"),
    }

    // Initialize DB
    models.InitDB(config)

    // Load the routes
    routes.AuthRoutes(r)

    // Run the server
    r.Run(":8080")
}
This is the main function of the application. It performs the following actions:
Creates a new instance of the Gin web framework.
Loads the environment variables from a
.envfile.Initializes the database connection using the configurations obtained from the environment variables.
Calls the
AuthRoutesfunction to define the routes for the application.Starts the web server on port 8080.
Meme Time:
Tired? Refresh your mind with this Low Effort Meme:
*le gophers after reading this much.

5️⃣ Defining Controllers:
This will contain all the logic for the authentication and authorization which was previously mapped in routes package.
// PATH: go-auth/controllers/auth.go

package controllers

import (
    "go-auth/models"
    "time"

    "go-auth/utils"

    "github.com/dgrijalva/jwt-go"
    "github.com/gin-gonic/gin"
)

// The string "my_secret_key" is just an example and should be replaced with a secret key of sufficient length and complexity in a real-world scenario.
var jwtKey = []byte("my_secret_key")
This code consists of several functions each handling different parts of the authentication process.
Login: Handles user login requests by receiving user credentials, verifying if the user exists, and checking if the provided password is correct. If everything is okay, it generates a JSON Web Token (JWT) and sets it as a cookie in the client's browser.// PATH: go-auth/controllers/auth.go func Login(c *gin.Context) { var user models.User if err := c.ShouldBindJSON(&user); err != nil { c.JSON(400, gin.H{"error": err.Error()}) return } var existingUser models.User models.DB.Where("email = ?", user.Email).First(&existingUser) if existingUser.ID == 0 { c.JSON(400, gin.H{"error": "user does not exist"}) return } errHash := utils.CompareHashPassword(user.Password, existingUser.Password) if !errHash { c.JSON(400, gin.H{"error": "invalid password"}) return } expirationTime := time.Now().Add(5 * time.Minute) claims := &models.Claims{ Role: existingUser.Role, StandardClaims: jwt.StandardClaims{ Subject: existingUser.Email, ExpiresAt: expirationTime.Unix(), }, } token := jwt.NewWithClaims(jwt.SigningMethodHS256, claims) tokenString, err := token.SignedString(jwtKey) if err != nil { c.JSON(500, gin.H{"error": "could not generate token"}) return } c.SetCookie("token", tokenString, int(expirationTime.Unix()), "/", "localhost", false, true) c.JSON(200, gin.H{"success": "user logged in"}) }Signup: Handles user signup requests by receiving user information, checking if the user already exists, hashing the password, and creating a new user in the database.// PATH: go-auth/controllers/auth.go func Signup(c *gin.Context) { var user models.User if err := c.ShouldBindJSON(&user); err != nil { c.JSON(400, gin.H{"error": err.Error()}) return } var existingUser models.User models.DB.Where("email = ?", user.Email).First(&existingUser) if existingUser.ID != 0 { c.JSON(400, gin.H{"error": "user already exists"}) return } var errHash error user.Password, errHash = utils.GenerateHashPassword(user.Password) if errHash != nil { c.JSON(500, gin.H{"error": "could not generate password hash"}) return } models.DB.Create(&user) c.JSON(200, gin.H{"success": "user created"}) }Home: Handles requests to the home page by checking if the user is authorized to access it by looking for the JWT in the client's cookie and verifying it. If the user is authorized, the function returns the "home page" message along with the user's role.// PATH: go-auth/controllers/auth.go func Home(c *gin.Context) { cookie, err := c.Cookie("token") if err != nil { c.JSON(401, gin.H{"error": "unauthorized"}) return } claims, err := utils.ParseToken(cookie) if err != nil { c.JSON(401, gin.H{"error": "unauthorized"}) return } if claims.Role != "user" && claims.Role != "admin" { c.JSON(401, gin.H{"error": "unauthorized"}) return } c.JSON(200, gin.H{"success": "home page", "role": claims.Role}) }Premium: Similar to theHomefunction but only returns the "premium page" message and the user's role if the user has an "admin" role.// PATH: go-auth/controllers/auth.go func Premium(c *gin.Context) { cookie, err := c.Cookie("token") if err != nil { c.JSON(401, gin.H{"error": "unauthorized"}) return } claims, err := utils.ParseToken(cookie) if err != nil { c.JSON(401, gin.H{"error": "unauthorized"}) return } if claims.Role != "admin" { c.JSON(401, gin.H{"error": "unauthorized"}) return } c.JSON(200, gin.H{"success": "premium page", "role": claims.Role}) }Logout: Handles user logout requests by deleting the JWT cookie in the client's browser.// PATH: go-auth/controllers/auth.go func Logout(c *gin.Context) { c.SetCookie("token", "", -1, "/", "localhost", false, true) c.JSON(200, gin.H{"success": "user logged out"}) }
The JWT is encrypted and signed using the HS256 algorithm and the secret key jwtKey.
REMEMBER: The string "my_secret_key" is just an example and should be replaced with a secret key of sufficient length and complexity in a real-world scenario.
6️⃣ Creating Utility Function:
We are going to need these 3 utility functions in our project.
GenerateHashPassword: This function takes a plain text password as input and returns a hash value generated from it using a one-way hashing algorithm. The purpose of this function is to store a user's password securely in the database. This way, even if the database is compromised, the attacker cannot retrieve the original password as it is encrypted.
 // PATH: go-auth/utils/GenerateHashPassword.go

 package utils

 import "golang.org/x/crypto/bcrypt"

 func GenerateHashPassword(password string) (string, error) {
     bytes, err := bcrypt.GenerateFromPassword([]byte(password), 14)
     return string(bytes), err
 }
CompareHashPassword: This function takes the user input password and the hashed password stored in the database and compares them. If the hashes match, it returns true. This function is used to verify if the user has entered the correct password during login.
 // PATH: go-auth/utils/CompareHashPassword.go

 package utils

 import "golang.org/x/crypto/bcrypt"

 func CompareHashPassword(password, hash string) bool {
     err := bcrypt.CompareHashAndPassword([]byte(hash), []byte(password))
     return err == nil
 }
ParseToken: This function takes a JWT token as input and returns the claims contained in it. Claims are a set of key-value pairs that represent the information being transmitted between parties. In this case, the claims may include the subject (email), role, and expiration time of the token. This function is used to validate if the token is legitimate and to retrieve information contained in it.
 // PATH: go-auth/utils/ParseToken.go

 package utils

 import (
     "go-auth/models"

     "github.com/dgrijalva/jwt-go"
 )

 func ParseToken(tokenString string) (claims *models.Claims, err error) {
     token, err := jwt.ParseWithClaims(tokenString, &models.Claims{}, func(token *jwt.Token) (interface{}, error) {
         return []byte("my_secret_key"), nil
     })

     if err != nil {
         return nil, err
     }

     claims, ok := token.Claims.(*models.Claims)

     if !ok {
         return nil, err
     }

     return claims, nil
 }
7️⃣ Creating Middlewares:
This is an example of middleware for authorization. You can use this to authorize any route you create.
// PATH: go-auth/middlewares/isAuthorized.go

package middlewares

import (
    "go-auth/utils"

    "github.com/gin-gonic/gin"
)

func IsAuthorized() gin.HandlerFunc {
    return func(c *gin.Context) {
        cookie, err := c.Cookie("token")

        if err != nil {
            c.JSON(401, gin.H{"error": "unauthorized"})
            c.Abort()
            return
        }

        claims, err := utils.ParseToken(cookie)

        if err != nil {
            c.JSON(401, gin.H{"error": "unauthorized"})
            c.Abort()
            return
        }

        c.Set("role", claims.Role)
        c.Next()
    }
}
The function IsAuthorized returns a Gin handler function, which is used to process HTTP requests and responses in a Gin web application.
The handler function retrieves the "token" cookie from the incoming HTTP request and tries to parse it using the ParseToken function from the utils package. If the cookie is missing or the parsing fails, the function returns a JSON response with a 401 Unauthorized HTTP status code and an error message, indicating that the user is not authorized to access the requested resource.
If the token parsing is successful, the function sets the "role" value in the context object (c) to the value of the "Role" claim in the parsed token, and calls the Next method to continue processing the request in the next middleware or handler in the middleware chain.
😇 Conclusion
In conclusion, implementing authentication and authorization in Golang is a straightforward process. By following the steps outlined in this article, you can create a secure and efficient authentication and authorization system for your Golang application. Whether you are building a simple web app or a complex enterprise system, Golang provides all the tools you need to ensure that your users' data is protected. By using JWT tokens and hashing techniques, you can ensure that your authentication and authorization system is reliable, scalable, and easy to maintain. With the right tools and knowledge, you can make your Golang application a secure and trusted platform for your users.
GitHub Repository of the Project: https://github.com/tanmayVaish/go-auth


